In the previous post, we could read about how to use dev containers to streamline your developer workflow, and the benefits of containerizing, well, everything.
In this post I will walk you through my process of getting a
containerized development environment for a small Rust project up and
running using the devcontainer CLI. I will also show how to access
this enviroment using Emacs.

But first, a quick recap.
What is a Dev Container?
I'm assuming some familiarity with docker and containerization here.
A dev container is in its simplest form a docker container with two important modifications:
-
Your workspace/source code folder is shared between the containers file system and your host file system, such that any changes made to the files inside the container persists should the container stop or restart.
-
While a classic container generally has a single
CMDinstruction, that for example runs the relevant application, a dev container instead simply starts and does nothing, thus allowing you to connect to it and start hacking away.
Project Setup
To follow along, you will require Docker, and the devcontainer CLI.
As mentioned, this will be a Rust project, and we will thus be using Cargo, the Rust package manager, to set it up. Though, in the spirit of containerization, we will do it from inside the container, meaning we will not need to have it installed on our host machine.
- We'll create a project folder and initialize a rust project with cargo:
mkdir rust-dev-container && cd rust-dev-container
- Inside our project folder, we create another folder named
.devcontainer, and two files inside that folder:
mkdir .devcontainer && touch .devcontainer/Dockerfile && touch .devcontainer/devcontainer.json
The Dockerfile will specify our development environment, and the
devcontainer.json file will simply refer to the dockerfile.
- Fill the
Dockerfilewith the following content:
FROM mcr.microsoft.com/devcontainers/rust:0-1-bullseye

# Add rust-analyzer download and setup
RUN curl -L https://github.com/rust-lang/rust-analyzer/releases/download/2023-08-07/rust-analyzer-aarch64-unknown-linux-gnu.gz -o /usr/bin/rust-analyzer.gz
RUN gzip -d /usr/bin/rust-analyzer.gz
RUN chmod +x /usr/bin/rust-analyzer
We will use a rust docker image from Microsoft, and add the
rust-analyzer language server, which we will need to get
IntelliSense features in Emacs.
- Fill the
devcontainer.jsonfile with the following content:
{
  "name": "Rust Dev Container",
    "build" : {
      "dockerfile" : "Dockerfile"
    }
}
As mentioned, we simply reference the Dockerfile.
- Now, assuming docker is running, and the devcontainer CLI is available, we simply run the following command from our workspace folder:
devcontainer up --workspace-folder .
This will spin up the container, which means that we are basically done. From this point we can connect to our container and start developing.
- As a last step, we will initialize the project from inside the container by running the following command:
devcontainer exec --workspace-folder . cargo init
This will run cargo init inside our workspace folder inside the
container. Since this folder is connected to the folder you are
currently in, you can do a simple ls and see the changes on your
host machine.
And we are done!
This is basically all there is to setting up a dev container. In the next section we will connect to the container through Emacs and Tramp.
Emacs & Tramp
Working inside a container works exactly like working on a remote
machine, which works almost identically to working on your own
machine. The Emacs module which allows this is called Tramp You simply prefix the the file you want to open with
/docker:<CONTAINER ID>:. To find your container ID, you can run
docker ps in a terminal. Inside the container, the workspace folder
is located at /workspaces/. In our case, I'd do M-x find-file and
then enter:
/docker:7cdf905ea9e8:/workspaces/rust-dev-container/src/main.rs
and then simply start writing code.
NOTE: This is true for Emacs 29 and later. For earlier versions, you need this package.
To get IntelliSense features, I use eglot (which comes with Emacs
from version 29), an LSP client, and rustic, a rust mode. Eglot
automatically finds the rust-analyzer binary that we specified in
the docker file. To get rustic to work properly I had to tell it
where to find the cargo binary inside the container.
This is how I have configured those packages (using use-package):
(use-package eglot
  :config
  (setq eglot-events-buffer-size 0
        eglot-ignored-server-capabilities '(:inlayHintProvider)
        eglot-confirm-server-initiated-edits nil))

(use-package rustic
  :config
  ; Tell rustic where to find the cargo binary
  (setq rustic-cargo-bin-remote "/usr/local/cargo/bin/cargo")
  (setq rustic-lsp-client 'eglot))
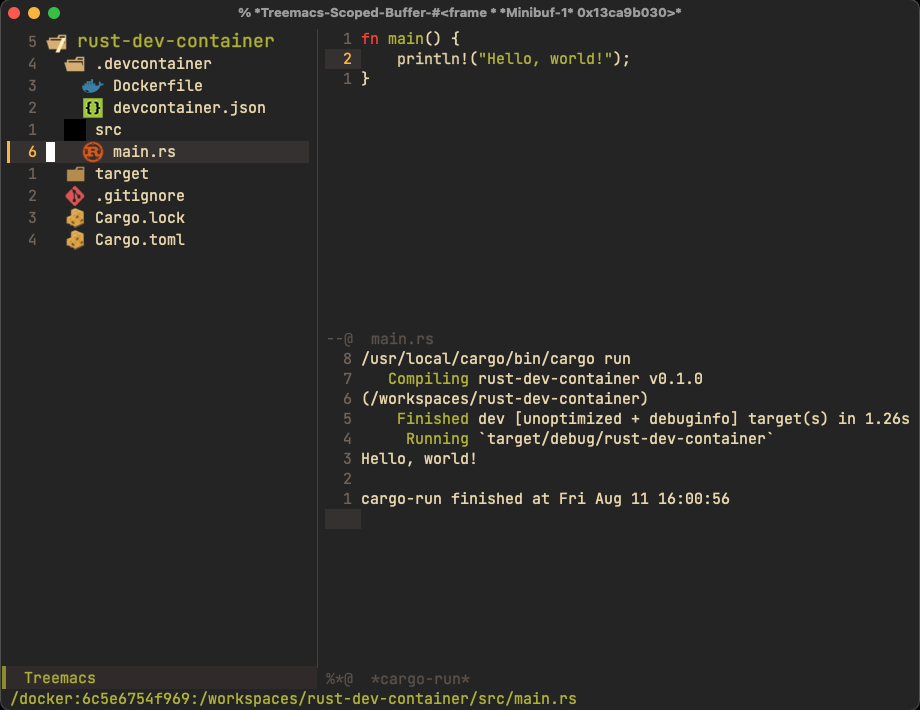
This is how the containerized project looks from my Emacs frame:

My full Emacs configuration can be found here. It is heavily inspired by Doom Emacs.
Conclusion
Dev containers are a great way to streamline the setup of your development environment, and you can even invite your Emacs using friends to the party.
Thanks for reading, and good luck with your projects!
